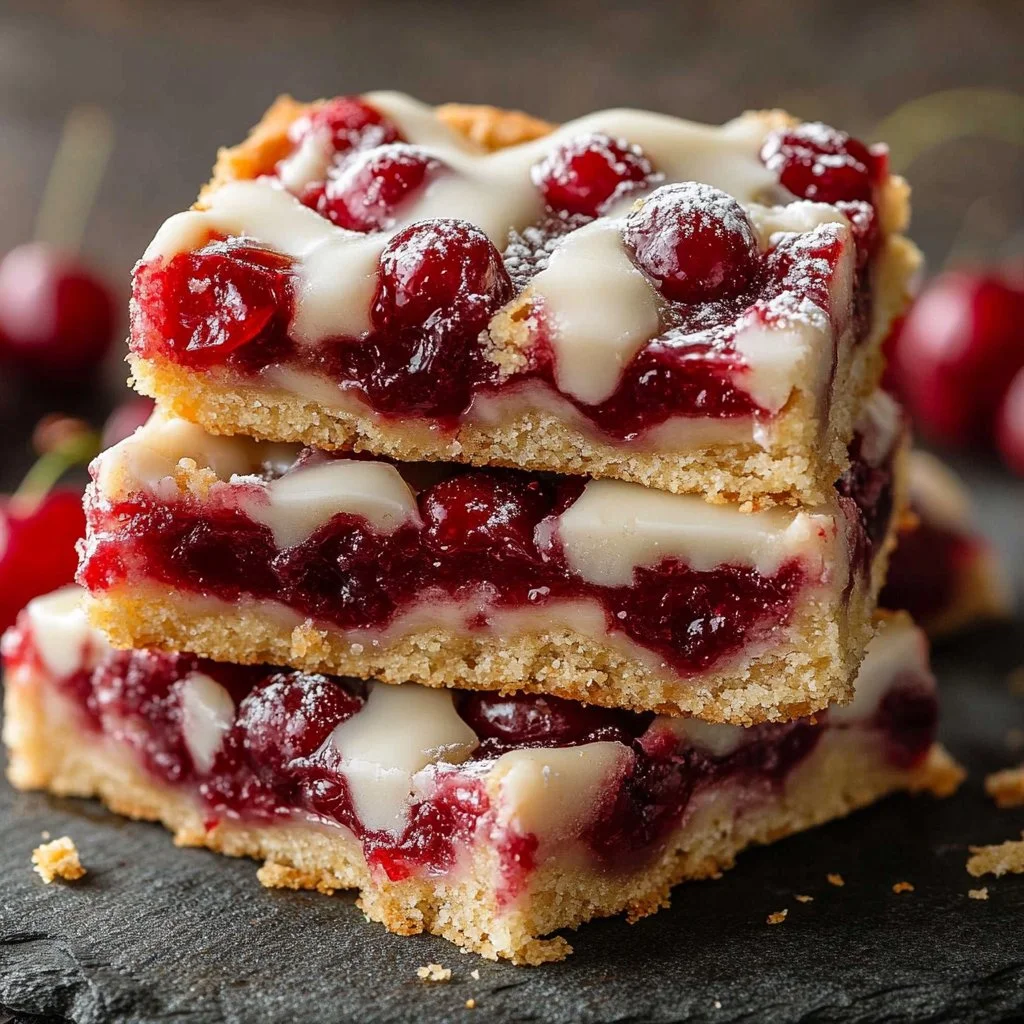
Christmas Cherry Bars Classic
Christmas Cherry Bars Classic are an enchanting addition to any festive gathering. These delightful bars layer a soft, buttery base with a sweet and tangy cherry filling, evoking the spirit of the holidays with each bite. Imagine cutting into these treats, their aroma filling the air as friends and family gather around, unable to resist the scrumptious allure. The combination of flavors and textures is perfectly balanced, making this recipe a must for your holiday dessert table. With a step-by-step guide in this article, you’ll find it easy to create a festive dessert that everyone will love.
Why You’ll Love This Recipe
The love for Christmas Cherry Bars Classic stems from their delightful simplicity and comforting taste. Perfect for family gatherings or holiday parties, this recipe is easy to prepare, ensuring that those who bake it can enjoy more time with their loved ones. The bars come together quickly, using minimal ingredients but delivering maximum flavor. With a mash-up of textures—from the chewy batter to the juicy cherry pie filling—every bite is a celebration of the holidays, making them a timeless favorite.
Ingredients for Christmas Cherry Bars Classic
The allure of Christmas Cherry Bars Classic lies in its straightforward yet indulgent ingredients:
- 1 cup (226 grams) unsalted butter, softened: This creamy base lends richness and depth to the bars.
- 2 cups (400 grams) granulated sugar: Sweetness that brings the festive spirit!
- 4 large eggs: They add moisture and bind the bars beautifully.
- 1 teaspoon pure vanilla extract: A touch of warmth and fragrance with each bite.
- 3 cups (360 grams) all-purpose flour: The foundation of our bars, keeping them light yet hearty.
- 1 teaspoon fine salt: Enhances the sweetness and balances flavors.
- 1 can (21 ounces or 595 grams) cherry pie filling: The star of the show, bursting with juicy cherries!
- 1 cup (120 grams) powdered sugar: Perfect for our sweet glaze.
- 2 tablespoons (30 milliliters) whole milk: To bring our glaze to the perfect consistency.
- 1/2 teaspoon pure vanilla extract (for glazing): A repeat of our earlier flavor for that extra touch.
Step-by-Step Directions for Christmas Cherry Bars Classic
- Preheat the oven to 350°F (175°C). Lightly grease a 9×13-inch (23×33 cm) baking pan to prevent sticking.
- In a large mixing bowl, beat the softened butter and granulated sugar together until the mixture is pale and fluffy; this usually takes about 3 to 5 minutes.
- Add the eggs one at a time, mixing thoroughly after each addition. Blend in the vanilla extract until combined.
- In a separate bowl, whisk together the all-purpose flour and salt. Gradually add the dry ingredients to the butter mixture, stirring until the batter is just combined.
- Spread approximately 3 cups of the prepared batter evenly into the bottom of the greased pan. Then, distribute the cherry pie filling evenly over the batter.
- Using a spoon, drop small portions of the remaining batter over the cherry filling, leaving some of the filling exposed.
- Transfer to the oven and bake for 35–40 minutes, or until the top is golden brown and a toothpick inserted into the center comes out clean.
- Remove the pan from the oven and allow the bars to cool completely in the pan on a wire rack.
- If glazing, whisk the powdered sugar, milk, and an additional ½ teaspoon of pure vanilla extract in a small bowl until smooth. Drizzle evenly over the cooled bars.
- Cut into bars of your desired size and serve at room temperature.
Tips & Tricks
- Chef’s Secrets: Always ensure your butter is at room temperature for the best texture in your bars.
- Optional Extras: Consider adding a sprinkle of cinnamon or nutmeg to the batter for a warm spice note, perfect for the holiday vibes.
- Cooking Hacks: Line your baking pan with parchment paper for even easier removal once the bars have cooled.
Serving Suggestions & Pairings
Christmas Cherry Bars Classic are versatile and pair beautifully with a variety of accompaniments. Serve them with a scoop of vanilla ice cream atop for added decadence. A dollop of whipped cream on the side can elevate their sweetness even more. For a festive touch, present them on a decorative platter surrounded by seasonal greens, or enjoy them with a warm cup of chamomile or spiced tea for a cozy winter experience.
Nutritional Information
While indulging in Christmas Cherry Bars Classic, it’s worth noting the balance of flavors and satisfaction they bring. Each bar typically contains approximately 200 calories, depending on the serving size. Rich in carbohydrates from the sugar and flour base, these bars also provide some protein from the eggs. However, for a little indulgence, be mindful of portions, especially around the holidays when treats are often abundant.
Storing Tips & Variations for Christmas Cherry Bars Classic
To keep your bars fresh, store them in an airtight container at room temperature for up to 4 days or refrigerate them for up to a week. They can also be frozen for longer storage; cut them into bars and layer with parchment paper in a freezer-safe container. For a lighter twist, consider substituting half of the flour with almond flour or adding oats for a heartier texture. You can also experiment with different pie fillings such as blueberry or peach for a fun accent to this classic recipe.
Conclusion for Christmas Cherry Bars Classic
Don’t wait to bring the joy of Christmas Cherry Bars Classic into your kitchen! These bars are a delightful way to celebrate the holidays, making it easy to fill your home with festive cheer and scrumptious aromas. They’re perfect for sharing, ensuring that everyone enjoys a sweet taste of the season. Get started on this step-by-step recipe now, and bask in the smiles that come with each delicious bite.
FAQs
Can I use fresh cherries instead of pie filling?
Absolutely! You can use fresh or frozen cherries, but make sure to sweeten them slightly with sugar to mimic the pie filling’s sweetness.
How can I make these bars gluten-free?
Substitute the all-purpose flour with a 1:1 gluten-free baking blend, ensuring that all other ingredients are also gluten-free.
How do I prevent the bars from drying out?
Ensure you don’t overbake them; check for doneness toward the lower end of the baking time given. Keeping them covered will also help.
Can I prepare the batter ahead of time?
Yes, you can prepare the batter a day ahead and store it in the refrigerator. Just bring it to room temperature before spreading it in the pan.
What is the best way to cut these bars?
For clean cuts, use a serrated knife and wipe it down between cuts to ensure the edges remain neat and tidy.
PrintChristmas Cherry Bars Classic

A festive dessert featuring a buttery base layered with tangy cherry filling, perfect for holiday gatherings.
- Prep Time: 15
- Cook Time: 40
- Total Time: 55
- Yield: 16 servings 1x
- Category: Dessert
- Method: Baking
- Cuisine: American
- Diet: Vegetarian
Ingredients
- 1 cup (226 grams) unsalted butter, softened
- 2 cups (400 grams) granulated sugar
- 4 large eggs
- 1 teaspoon pure vanilla extract
- 3 cups (360 grams) all-purpose flour
- 1 teaspoon fine salt
- 1 can (21 ounces or 595 grams) cherry pie filling
- 1 cup (120 grams) powdered sugar
- 2 tablespoons (30 milliliters) whole milk
- 1/2 teaspoon pure vanilla extract (for glazing)
Instructions
- Preheat the oven to 350°F (175°C) and grease a 9×13-inch baking pan.
- In a large mixing bowl, beat the butter and granulated sugar until pale and fluffy, about 3 to 5 minutes.
- Add eggs one at a time, mixing thoroughly after each addition, then blend in the vanilla extract.
- In a separate bowl, whisk together the flour and salt, then gradually add to the butter mixture until just combined.
- Spread approximately 3 cups of the batter into the greased pan and distribute the cherry pie filling over it.
- Drop small portions of the remaining batter over the cherry filling, exposing some of the filling.
- Bake for 35–40 minutes until golden brown and a toothpick comes out clean.
- Allow to cool completely in the pan on a wire rack.
- For glazing, whisk powdered sugar, milk, and vanilla extract until smooth and drizzle over cooled bars.
- Cut into bars and serve at room temperature.
Notes
For best texture, ensure butter is at room temperature. Consider adding spices like cinnamon for added flavor.
Nutrition
- Serving Size: 1 bar
- Calories: 200
- Sugar: 22g
- Sodium: 150mg
- Fat: 8g
- Saturated Fat: 5g
- Unsaturated Fat: 3g
- Trans Fat: 0g
- Carbohydrates: 30g
- Fiber: 1g
- Protein: 2g
- Cholesterol: 50mg